
New Releases |
Hidden Object Games |
Match 3 Games |
Time Management Games |
Strategy Games |
Puzzle Games |
Card Games |
Action Games |
Word Games
Azada: Elementa Walkthrough 7

Azada: Elementa Walkthrough 7
* OS: Windows 7 / Vista / XP
* CPU: Pentium 3 1.0 GHz or Higher
* OS: Windows 7 / Vista / XP
* CPU: Pentium 3 1.0 GHz or Higher
Azada: Elementa Walkthrough 7
* OS: Windows 7 / Vista / XP
* CPU: Pentium 3 1.0 GHz or Higher
* OS: Windows 7 / Vista / XP
* CPU: Pentium 3 1.0 GHz or Higher
Azada: Elementa Walkthrough 7 Screenshots, Videos:

Follow our crystal clear walkthrough and helpful tricks to get you through the rough spots! Click the button to download full walkthrough.
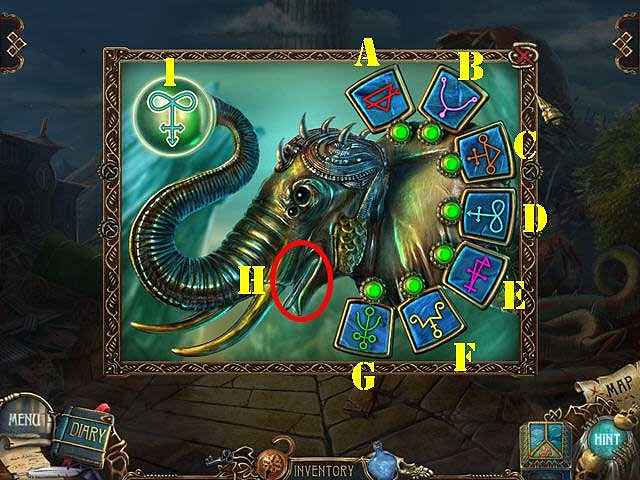
* Remember the sequence of symbols in the crystal ball (1) and duplicate them on the earrings.
* First sequence: D, E, G.
* Second sequence: A, C, F, B.
* Take the TWEEZERS (H).
* Walk down.
* Zoom into the plant; remove the rat and place the BOX LOCK PART on the lock. Take the CRAB'S GLASSES (J).
* Go right.
* Zoom into the crab and place the CRAB'S GLASSES on it to activate a puzzle.
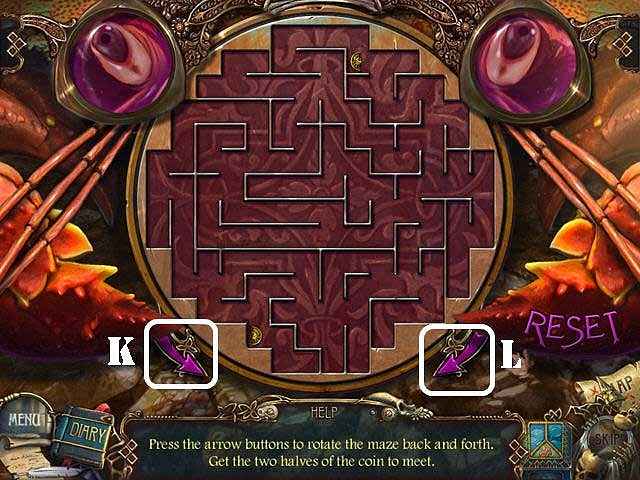
* Use the arrow buttons to rotate the maze until both coin parts meet.
* To solve the puzzle, select the arrows in this order: K x 2, L x 3, K, L, K, L, K, L x 2, K x 3, L x 2, K x 2, L, K x 2, L, K x 3,L x 2, K x 2, L and K.
* Take the MAGIC STAFF.
* Return to Panoptes' residence.
* Remember the sequence of symbols in the crystal ball (1) and duplicate them on the earrings.
* First sequence: D, E, G.
* Second sequence: A, C, F, B.
* Take the TWEEZERS (H).
* Walk down.
* Zoom into the plant; remove the rat and place the BOX LOCK PART on the lock. Take the CRAB'S GLASSES (J).
* Go right.
* Zoom into the crab and place the CRAB'S GLASSES on it to activate a puzzle.
* Use the arrow buttons to rotate the maze until both coin parts meet.
* To solve the puzzle, select the arrows in this order: K x 2, L x 3, K, L, K, L, K, L x 2, K x 3, L x 2, K x 2, L, K x 2, L, K x 3,L x 2, K x 2, L and K.
* Take the MAGIC STAFF.
* Return to Panoptes' residence.


 REFRESH