
New Releases |
Hidden Object Games |
Match 3 Games |
Time Management Games |
Strategy Games |
Puzzle Games |
Card Games |
Action Games |
Word Games
Chimeras: Tune of Revenge Walkthrough 4

Chimeras: Tune of Revenge Walkthrough 4
* OS: Windows 7 / Vista / XP
* CPU: Pentium 3 1.0 GHz or Higher
* OS: Windows 7 / Vista / XP
* CPU: Pentium 3 1.0 GHz or Higher
Chimeras: Tune of Revenge Walkthrough 4
* OS: Windows 7 / Vista / XP
* CPU: Pentium 3 1.0 GHz or Higher
* OS: Windows 7 / Vista / XP
* CPU: Pentium 3 1.0 GHz or Higher
Chimeras: Tune of Revenge Walkthrough 4 Screenshots, Videos:

Follow our crystal clear walkthrough and helpful tricks to get you through the rough spots! Click the button to download full walkthrough.
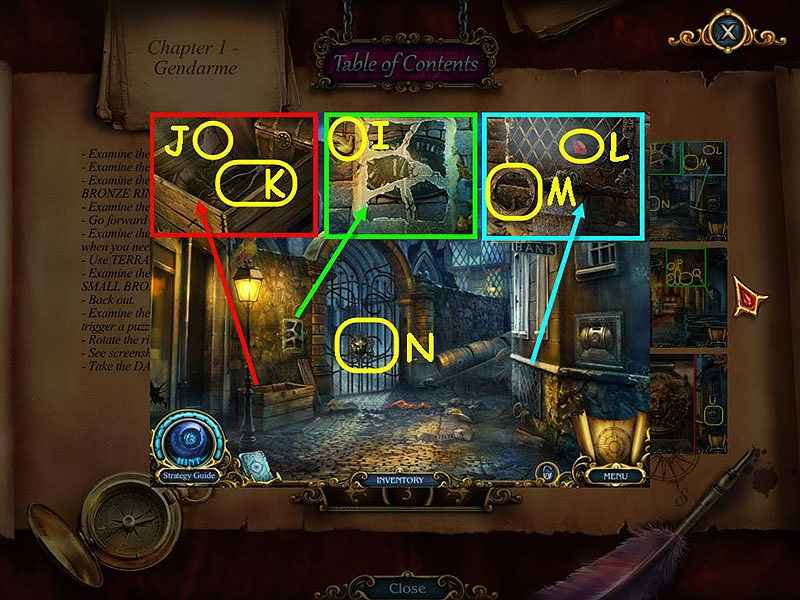
- Examine the wall: take the DOVE MEDALLION (I).
- Examine the crate; take the 2nd PIECE OF PAPER (J), and NIPPERS (K).
- Examine the grate and use the NIPPERS on it; take the RUBY to get RUBIES 2/2 (L), and the BIG BRONZE RING (M).
- Examine the gate and place the 2 RUBIES on the eye sockets (N).
- Go forward through the newly-opened gates.
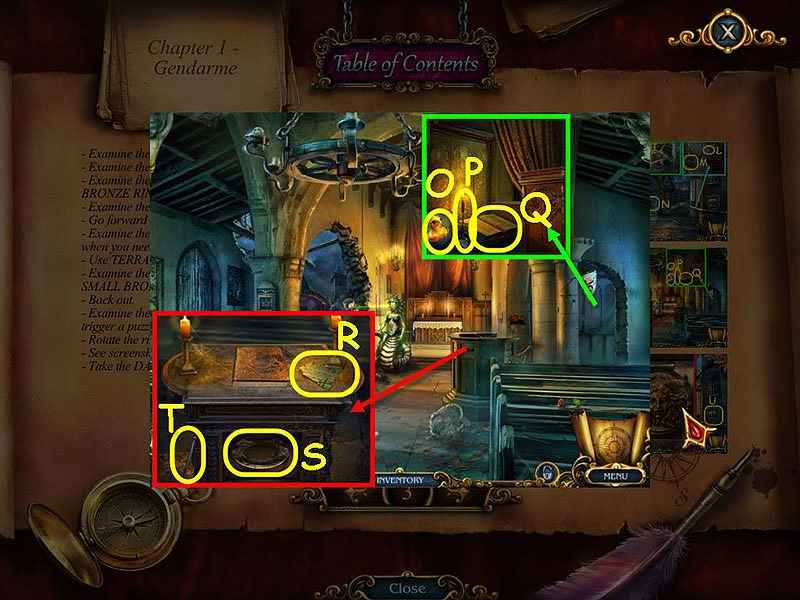
- Examine the alcove and crack the egg twice; take TERRANCE (O). You can now use TERRANCE when you need to light something or do not want to get burned.
- UseTERKANCE to light the candle (P); take the PRA YER BOOK (Q).
- Examine the pulpit and place the PRA YER BOOK on it; take the 3rd PIECE OF PAPER (R), SMALL BRONZE RING (S). and the HOIST HANDLE (T).
- Back out.
- Examine the safe and place the BIG BRONZE RING and the SMALL BRONZE RING on it to trigger a puzzle (U).
- Rotate the rings to complete the picture.
- See screenshot for solution (V).
- Take the DAGGER.
- Examine the wall: take the DOVE MEDALLION (I).
- Examine the crate; take the 2nd PIECE OF PAPER (J), and NIPPERS (K).
- Examine the grate and use the NIPPERS on it; take the RUBY to get RUBIES 2/2 (L), and the BIG BRONZE RING (M).
- Examine the gate and place the 2 RUBIES on the eye sockets (N).
- Go forward through the newly-opened gates.
- Examine the alcove and crack the egg twice; take TERRANCE (O). You can now use TERRANCE when you need to light something or do not want to get burned.
- UseTERKANCE to light the candle (P); take the PRA YER BOOK (Q).
- Examine the pulpit and place the PRA YER BOOK on it; take the 3rd PIECE OF PAPER (R), SMALL BRONZE RING (S). and the HOIST HANDLE (T).
- Back out.
- Examine the safe and place the BIG BRONZE RING and the SMALL BRONZE RING on it to trigger a puzzle (U).
- Rotate the rings to complete the picture.
- See screenshot for solution (V).
- Take the DAGGER.


 REFRESH