
New Releases |
Hidden Object Games |
Match 3 Games |
Time Management Games |
Strategy Games |
Puzzle Games |
Card Games |
Action Games |
Word Games
Fear For Sale: Phantom Tide Walkthrough 10

Fear For Sale: Phantom Tide Walkthrough 10
* OS: Windows 7 / Vista / XP
* CPU: Pentium 3 1.0 GHz or Higher
* OS: Windows 7 / Vista / XP
* CPU: Pentium 3 1.0 GHz or Higher
Fear For Sale: Phantom Tide Walkthrough 10
* OS: Windows 7 / Vista / XP
* CPU: Pentium 3 1.0 GHz or Higher
* OS: Windows 7 / Vista / XP
* CPU: Pentium 3 1.0 GHz or Higher
Fear For Sale: Phantom Tide Walkthrough 10 Screenshots, Videos:

Follow our crystal clear walkthrough and helpful tricks to get you through the rough spots! Click the button to download full walkthrough.
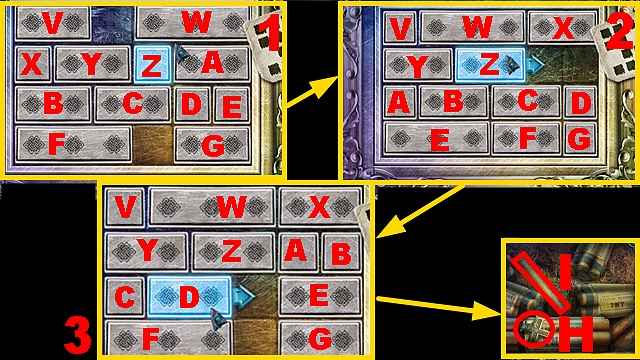
Play the mini-game.
Solution part (1): G-left, E-down, D-right, C-right, B-right, X-down, Y-left, Z-left, Z-up, Y-right x2, V-down, Z-left x2, W-left x2, A-up, Y-right x2, V-right x2.
Solution part (2): V-down, W-left, Y-left, Z-left, D-up, C-right, W-right, V-up, A-up, B-right, A-down, Y-left, Z-left, D-left, B-left, C-left, G-up x2, F-right, C-right.
Solution part (3): F-right, C-down, D-left, E-left x2, G-up, F-right x2, C-right x2, D-down, Y-down, Z-left x2, A-left x2, B-left x2, G-up, E-right x2, D-right, B-down, A-right, Z-right, V-down x2, Z-left, A-left, G-left, W-left.
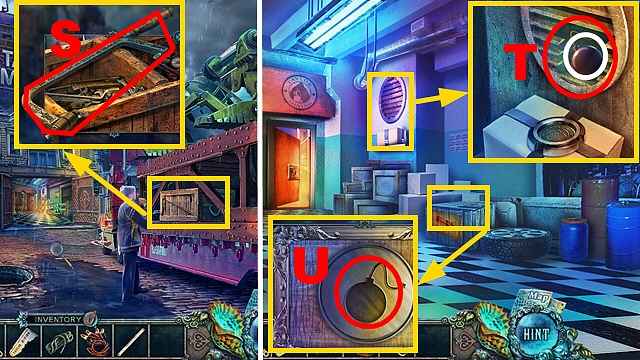
Take the CROSS EMBLEM (H); place the TORN LABEL (I).
Try to walk down.
Place the BROKEN RADIO (J) and JUMPER CABLES (K).
Talk through the radio.
Use the shell (L); take the EMBLEM (green).
Place the EMBLEM (M); take the ACCESS CARD (N).
Use the ACCESS CARD (O).
Move forward.
Play the mini-game.
Solution part (1): G-left, E-down, D-right, C-right, B-right, X-down, Y-left, Z-left, Z-up, Y-right x2, V-down, Z-left x2, W-left x2, A-up, Y-right x2, V-right x2.
Solution part (2): V-down, W-left, Y-left, Z-left, D-up, C-right, W-right, V-up, A-up, B-right, A-down, Y-left, Z-left, D-left, B-left, C-left, G-up x2, F-right, C-right.
Solution part (3): F-right, C-down, D-left, E-left x2, G-up, F-right x2, C-right x2, D-down, Y-down, Z-left x2, A-left x2, B-left x2, G-up, E-right x2, D-right, B-down, A-right, Z-right, V-down x2, Z-left, A-left, G-left, W-left.
Take the CROSS EMBLEM (H); place the TORN LABEL (I).
Try to walk down.
Place the BROKEN RADIO (J) and JUMPER CABLES (K).
Talk through the radio.
Use the shell (L); take the EMBLEM (green).
Place the EMBLEM (M); take the ACCESS CARD (N).
Use the ACCESS CARD (O).
Move forward.


 REFRESH