
New Releases |
Hidden Object Games |
Match 3 Games |
Time Management Games |
Strategy Games |
Puzzle Games |
Card Games |
Action Games |
Word Games
Grim Facade: Cost of Jealousy Walkthrough 13

Grim Facade: Cost of Jealousy Walkthrough 13
* OS: Windows 7 / Vista / XP
* CPU: Pentium 3 1.0 GHz or Higher
* OS: Windows 7 / Vista / XP
* CPU: Pentium 3 1.0 GHz or Higher
Grim Facade: Cost of Jealousy Walkthrough 13
* OS: Windows 7 / Vista / XP
* CPU: Pentium 3 1.0 GHz or Higher
* OS: Windows 7 / Vista / XP
* CPU: Pentium 3 1.0 GHz or Higher
Grim Facade: Cost of Jealousy Walkthrough 13 Screenshots, Videos:

Follow our crystal clear walkthrough and helpful tricks to get you through the rough spots! Click the button to download full walkthrough.
Touch anywhere on the scene to activate a cut scene.
Take the BOOK (A).
Zoom into the large table; use the FLASK on the oil to get the FLASK WITH OIL (B).
Zoom into the small table; open the shell and take the GOLD COIN (@) and the PEARL (C).
Take a closer look at the dinosaur's mouth; insert the FORK in it and take the MAP FRAGMENT 1/5 (D).
Go through the doorway.
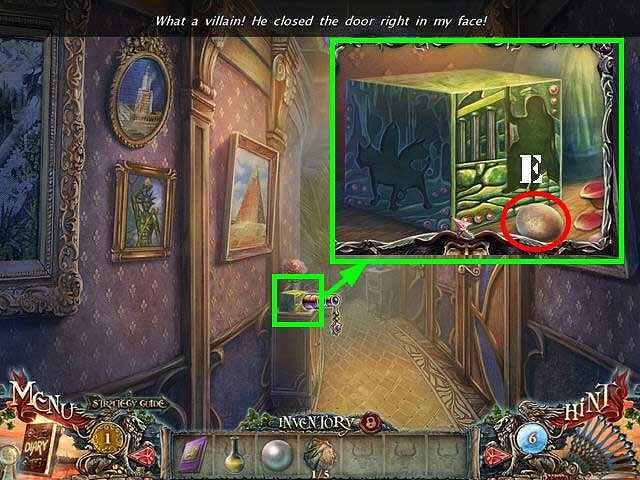
Zoom into the box on the table and take the EGG (E).
Walk down twice.
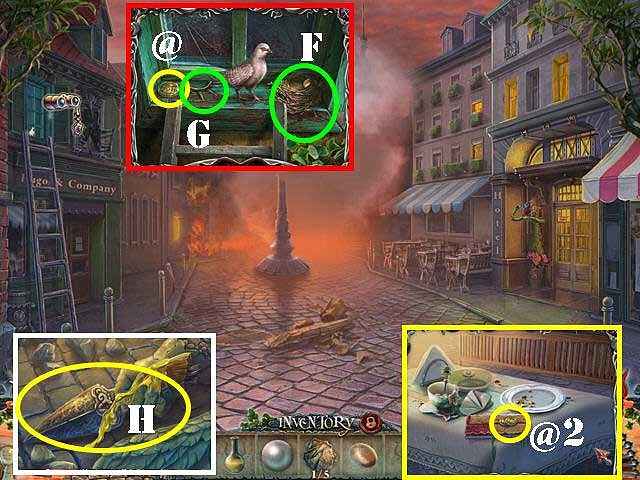
Zoom into the window; place the EGG in the nest (F) and take the GOLD COIN (@) and the CROWN (G).
Take a closer look at the stone hand; use the FLASK WITH OIL on it and take the SPEARHEAD (H).
Zoom into the table; open the purse with the SPEARHEAD and take the 2 COINS (@2).
Go back into the office and then go through the doorway.
Touch anywhere on the scene to activate a cut scene.
Take the BOOK (A).
Zoom into the large table; use the FLASK on the oil to get the FLASK WITH OIL (B).
Zoom into the small table; open the shell and take the GOLD COIN (@) and the PEARL (C).
Take a closer look at the dinosaur's mouth; insert the FORK in it and take the MAP FRAGMENT 1/5 (D).
Go through the doorway.
Zoom into the box on the table and take the EGG (E).
Walk down twice.
Zoom into the window; place the EGG in the nest (F) and take the GOLD COIN (@) and the CROWN (G).
Take a closer look at the stone hand; use the FLASK WITH OIL on it and take the SPEARHEAD (H).
Zoom into the table; open the purse with the SPEARHEAD and take the 2 COINS (@2).
Go back into the office and then go through the doorway.


 REFRESH