
New Releases |
Hidden Object Games |
Match 3 Games |
Time Management Games |
Strategy Games |
Puzzle Games |
Card Games |
Action Games |
Word Games
Living Legends: Frozen Beauty Walkthrough 8

Living Legends: Frozen Beauty Walkthrough 8
* OS: Windows 7 / Vista / XP
* CPU: Pentium 3 1.0 GHz or Higher
* OS: Windows 7 / Vista / XP
* CPU: Pentium 3 1.0 GHz or Higher
Living Legends: Frozen Beauty Walkthrough 8
* OS: Windows 7 / Vista / XP
* CPU: Pentium 3 1.0 GHz or Higher
* OS: Windows 7 / Vista / XP
* CPU: Pentium 3 1.0 GHz or Higher
Living Legends: Frozen Beauty Walkthrough 8 Screenshots, Videos:
Follow our crystal clear walkthrough and helpful tricks to get you through the rough spots! Click the button to download full walkthrough.
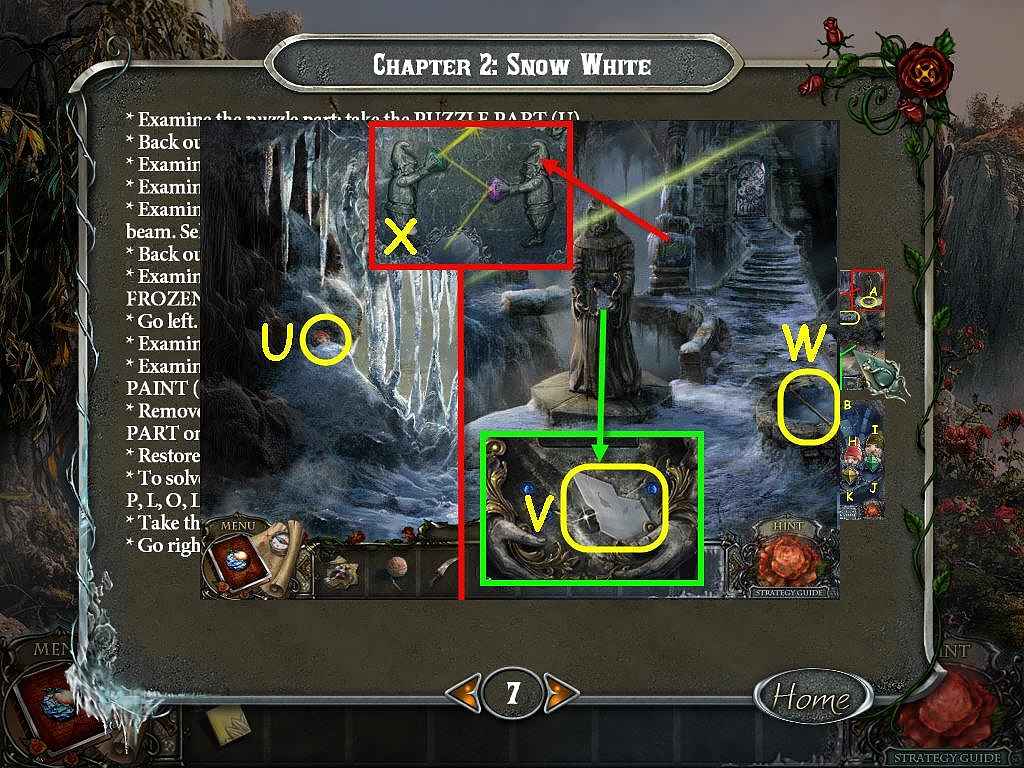
* Examine the puzzle part; take the PUZZLE PART (U).
* Back out.
* Examine the statue; take the MIRROR SHARD (V).
* Examine the well; take the PICK (W).
* Examine the pillar and position the gnome's arms to complete the beam. Select the green gem and the red gem once each (X).
* Back out.
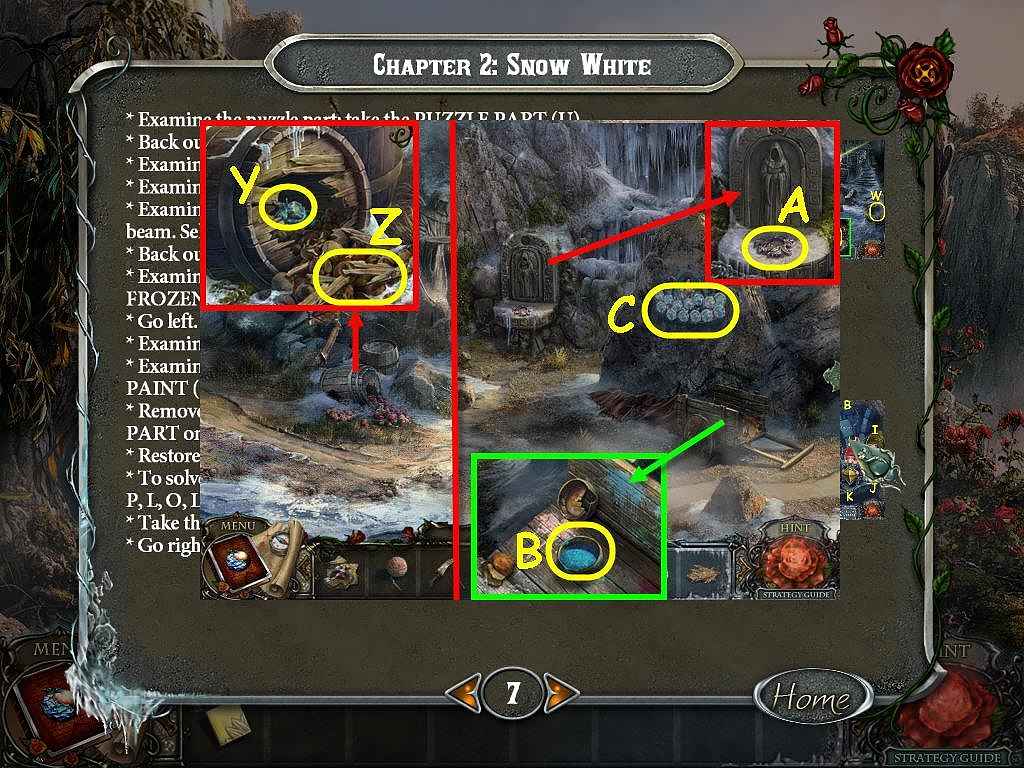
* Examine the barrel and use the PICK on it two times; take the FROZEN NUT (Y) and WOOD SCRAPS (Z).
* Go left.
* Examine the altar take the PUZZLE PART (A).
* Examine the cart; remove the leaves and read the note. Take the PAINT (B).
* Remove the cloth and examine the mural; place the round PUZZLE PART on it to trigger a puzzle (C).
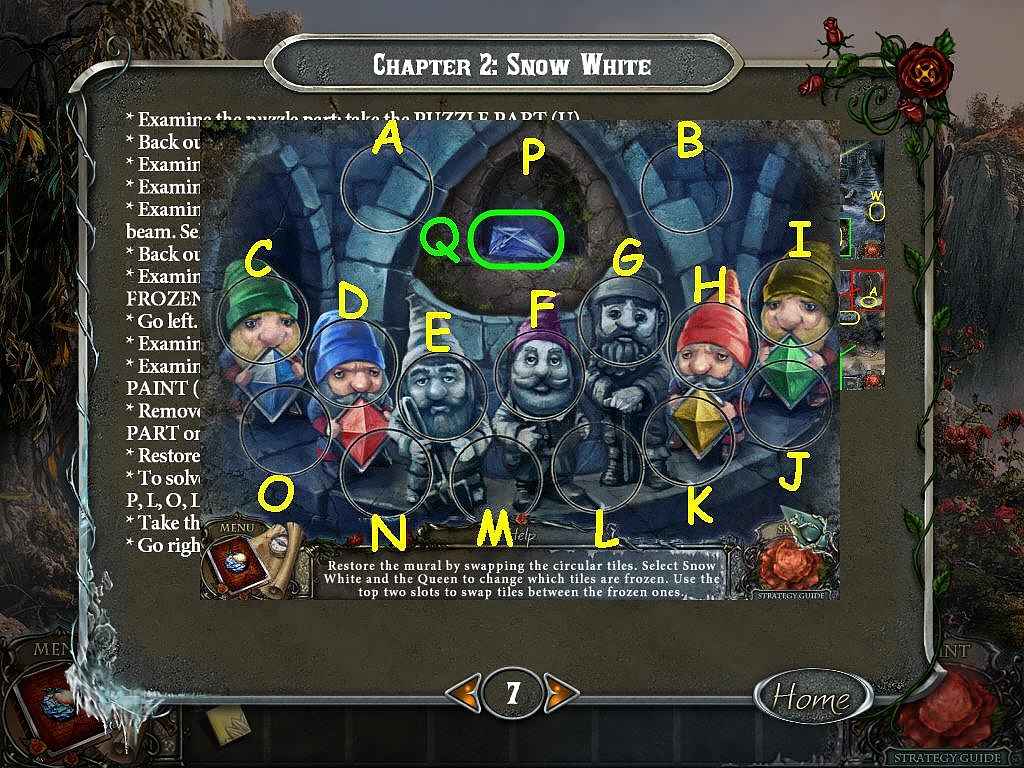
* Restore the mural.
* To solve the puzzle, select the following: D, M, P, A, G, A, N, B, E, B, I, P, L, O, L, B, A ,J, P, A, K, B, N, C, B, P, A, D, B, F, P, B and C.
* Take the CRYSTAL (Q).
* Go right.
* Examine the puzzle part; take the PUZZLE PART (U).
* Back out.
* Examine the statue; take the MIRROR SHARD (V).
* Examine the well; take the PICK (W).
* Examine the pillar and position the gnome's arms to complete the beam. Select the green gem and the red gem once each (X).
* Back out.
* Examine the barrel and use the PICK on it two times; take the FROZEN NUT (Y) and WOOD SCRAPS (Z).
* Go left.
* Examine the altar take the PUZZLE PART (A).
* Examine the cart; remove the leaves and read the note. Take the PAINT (B).
* Remove the cloth and examine the mural; place the round PUZZLE PART on it to trigger a puzzle (C).
* Restore the mural.
* To solve the puzzle, select the following: D, M, P, A, G, A, N, B, E, B, I, P, L, O, L, B, A ,J, P, A, K, B, N, C, B, P, A, D, B, F, P, B and C.
* Take the CRYSTAL (Q).
* Go right.


 REFRESH