
New Releases |
Hidden Object Games |
Match 3 Games |
Time Management Games |
Strategy Games |
Puzzle Games |
Card Games |
Action Games |
Word Games
Lost Tales: Forgotten Souls Walkthrough 6

Lost Tales: Forgotten Souls Walkthrough 6
* OS: Windows 7 / Vista / XP
* CPU: Pentium 3 1.0 GHz or Higher
* OS: Windows 7 / Vista / XP
* CPU: Pentium 3 1.0 GHz or Higher
Lost Tales: Forgotten Souls Walkthrough 6
* OS: Windows 7 / Vista / XP
* CPU: Pentium 3 1.0 GHz or Higher
* OS: Windows 7 / Vista / XP
* CPU: Pentium 3 1.0 GHz or Higher
Lost Tales: Forgotten Souls Walkthrough 6 Screenshots, Videos:

Follow our crystal clear walkthrough and helpful tricks to get you through the rough spots! Click the button to download full walkthrough.
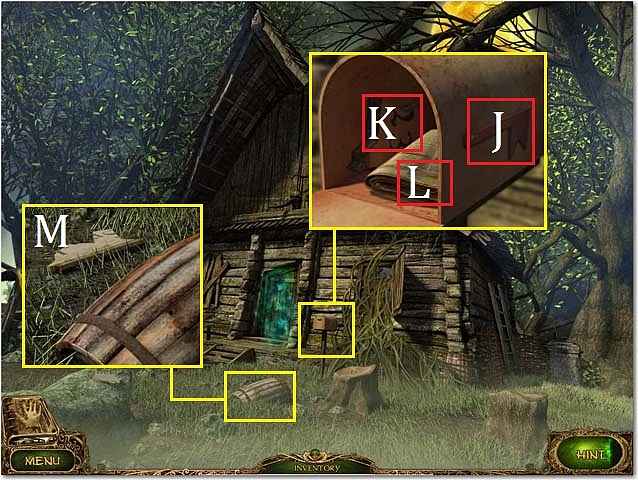
Zoom into the mailbox; place the MAILBOX FLAG on the box (J) and pull it down.
Collect the eleventh PLAQUE piece (K) and read the newspaper (L).
Zoom into the barrel; collect the twelfth PLAQUE piece (M).
Return to the side yard.
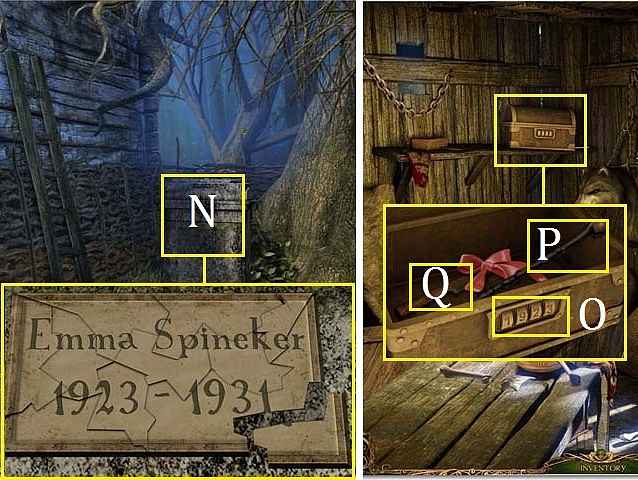
Place the twelve PLAQUE pieces on the gravestone (N); arrange the pieces as they are shown in the screenshot.
Return to the back room through the gate in the front yard.
Zoom into the chest; set the dials (O) to 1923.
Open the chest; collect the CANE (P) and KNIFE (Q).
Back up one scene.
Zoom into the animal trap; trigger the trap with the cane and then collect the PLIERS (S).
Enter the back room.
Zoom into the crate; remove the nails with the PLIERS, remove the lid and then collect the CROWBAR (T).
Return to the front yard.
Zoom into the mailbox; place the MAILBOX FLAG on the box (J) and pull it down.
Collect the eleventh PLAQUE piece (K) and read the newspaper (L).
Zoom into the barrel; collect the twelfth PLAQUE piece (M).
Return to the side yard.
Place the twelve PLAQUE pieces on the gravestone (N); arrange the pieces as they are shown in the screenshot.
Return to the back room through the gate in the front yard.
Zoom into the chest; set the dials (O) to 1923.
Open the chest; collect the CANE (P) and KNIFE (Q).
Back up one scene.
Zoom into the animal trap; trigger the trap with the cane and then collect the PLIERS (S).
Enter the back room.
Zoom into the crate; remove the nails with the PLIERS, remove the lid and then collect the CROWBAR (T).
Return to the front yard.


 REFRESH