
New Releases |
Hidden Object Games |
Match 3 Games |
Time Management Games |
Strategy Games |
Puzzle Games |
Card Games |
Action Games |
Word Games
The Secret Order: Masked Intent Walkthrough 5

The Secret Order: Masked Intent Walkthrough 5
* OS: Windows 7 / Vista / XP
* CPU: Pentium 3 1.0 GHz or Higher
* OS: Windows 7 / Vista / XP
* CPU: Pentium 3 1.0 GHz or Higher
The Secret Order: Masked Intent Walkthrough 5
* OS: Windows 7 / Vista / XP
* CPU: Pentium 3 1.0 GHz or Higher
* OS: Windows 7 / Vista / XP
* CPU: Pentium 3 1.0 GHz or Higher
The Secret Order: Masked Intent Walkthrough 5 Screenshots, Videos:

Follow our crystal clear walkthrough and helpful tricks to get you through the rough spots! Click the button to download full walkthrough.
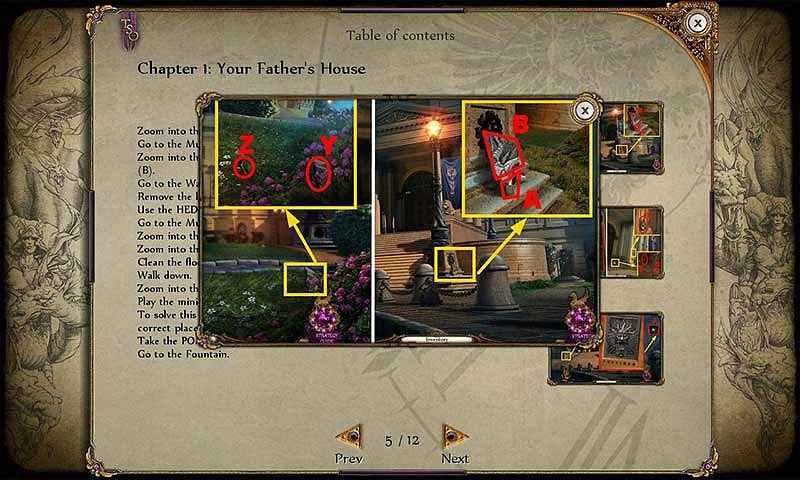
Zoom into the grass: take the 2/5 PUZZLE PIECE (Y) and the HILT (Z).
Go to the Museum Entrance.
Zoom into the streetlight; take the LIGHTER (A) and the 3/5 PUZZLE PIECE (B).
Go to the Warrior Statue.
Remove the leaves and take the 4/5 PUZZLE PIECE (C).
Use the HEDGE CLIPPERS three times to free the statue from leaves (D).
Go to the Museum Door.
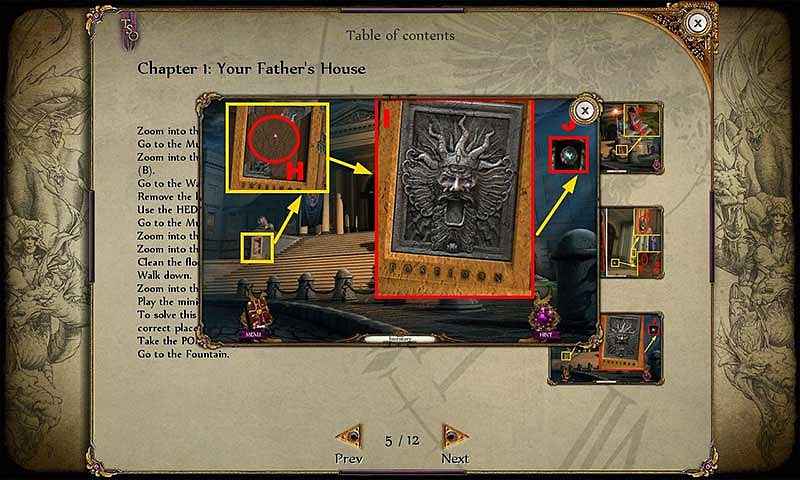
Zoom into the wall; take the 5/5 PUZZLE PIECE (E).
Zoom into the floor; take the SPEARHEAD (F).
Clean the floor with the RAG and take the BEZEL (G).
Walk down.
Zoom into the left area of the stairs; put down the 5 PUZZLE PIECES (H). Play the mini-game.
To solve this puzzle (I), rotate the picture pieces and put them back into the correct place.
Take the POMMEL (J).
Go to the Fountain.
Zoom into the grass: take the 2/5 PUZZLE PIECE (Y) and the HILT (Z).
Go to the Museum Entrance.
Zoom into the streetlight; take the LIGHTER (A) and the 3/5 PUZZLE PIECE (B).
Go to the Warrior Statue.
Remove the leaves and take the 4/5 PUZZLE PIECE (C).
Use the HEDGE CLIPPERS three times to free the statue from leaves (D).
Go to the Museum Door.
Zoom into the wall; take the 5/5 PUZZLE PIECE (E).
Zoom into the floor; take the SPEARHEAD (F).
Clean the floor with the RAG and take the BEZEL (G).
Walk down.
Zoom into the left area of the stairs; put down the 5 PUZZLE PIECES (H). Play the mini-game.
To solve this puzzle (I), rotate the picture pieces and put them back into the correct place.
Take the POMMEL (J).
Go to the Fountain.


 REFRESH